
Today I’m sharing how I hand paint a piece of furniture using Superior chalk paint, from start to finish like a Pro...

Because I only use Superior chalk paints on all of my projects, I get a lot of new customers ask about the process of painting with Superior chalk paint. I am always more than happy to answer any questions that come my way, but I thought it was about time I put together one helpful post that I can direct everyone to. So let’s get started!
Take a before picture!
Yes you will thank me later... and so will all your friends!

She’s a gorgeous free score one of our amazing clients (Nicole & Darren) graciously donated to us! I thought she would be perfect for this tutorial!
This is how I hand paint a piece of furniture from start to finish, with Superior Paint Co. chalk furniture paint:
Select Your Superior Chalk Paint Colour!
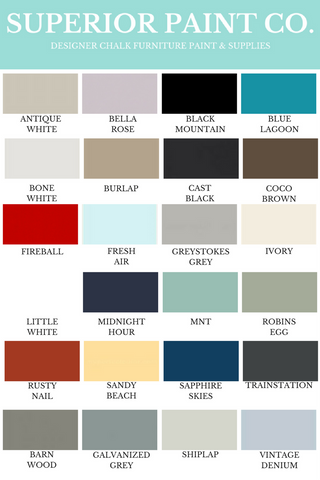
For this piece I've decided to use one of my personal favorites... Superior Paint Co. Fresh Air!

HOT TIP: Did you know you can make your own custom colour? Yes all our colours can be mixed with each other to make your very own Superior Paint Colour!
Buy a Quality Brush
Now you need a good quality paint brush.

We spent an entire year ordering and testing brushes from around the world in search of the highest quality and affordable chalk paint brush manufacture. We are so excited to have these brushes available to our all our customers!
Here's my babies... as you can see I do a lot of hand painting!

Left Oval Brush 1 year old, middle Flat Brush 3 months old & Chip Brush 2 years old.
Superior Oval: I use this brush 90% of the time. This brush in the photo I have used everyday for over a year now and lent it out to over 100 people in workshops that I have taught and its still in perfect condition. I asked Ray to cut the end off for me so I can get into tight areas.
Superior Flat Brush: I just started using just a couple months ago and its my personal second favorite.
Natural Chip Brush: I use for dry brushing, applying glazes or washes.
HOT TIP: The 2 inch angle brushes from your hardware store are designed for wall painters because they are a cut in brush designed for cutting in on flat surfaces NOT furniture painting!
Clean Your Masterpiece
The first thing you’ll need to do is give your masterpiece a wipe down. To clean your piece we recommend TSP ECO and a heavy duty 300 grit Brillo pad (this will remove dirt and lightly etch the surface to allow the paint to adhere better).

HOT TIP: TSP ECO is not like regular TSP it's a Eco-Friendly - rinse free - version that is safe for our your hands and environment.

Don’t use cleaning wipes like Lysol or Clorox wipes or even the generic brands they are a waste of money will not properly prep the surface and it's wasteful to our environment.
HOT TIP: If your piece has a high sheen like “Ikea Furniture or Melamine” we recommend giving it a light sand or using a de-glazer or stripper to cut the finish for better adhesion.
Patch Holes, Gouges, Scratches, etc
Look your furniture piece over for any gouges or deep scratches that need filling. If you plan to swap the original drawer handles the old holes needed to be filled.

Here's our current favorite wood filler SamaN wood putty.
Old hole is filled, sanded and I marked where my new handle will be.

Drill the new holes for the handle.
Make sure you use a water based wood filler and a putty knife.
HOT TIP: Water-based dries faster with less shrinkage and make sure its formaldehyde free filler!
Once filler is dry sand with 220 grit sandpaper or a sanding pad.

HOT TIP: If you forget to put the lid back on it will dry out... luckily with water-based filler you just need to add a little water and it will soften.
Taping:
If there are areas you don't want painted make sure to mask them off with painters tape so you get a nice clean line.

I Base Coated the drawers to hide the stains and remove the old furniture smell.
Do I need to Base Coat aka Prime?
The general answer is no.

However if you have an older piece you will likely experience the dreaded bleed-through aka Tannin's. Test in a in a small inconspicuous area first if you see a yellowish-brownish stain leak through that's a tannin and you will need to stop and apply Superior Base Coat to block the tannin stains from discoloring your paint job. If painting a light colour always check first, if painting with a dark colours tannin's may not always show.
HOT TIP: Is your furniture stinking like my project? Yes the older it is the sinker it may be ... to remove the smell from the inside of the drawers, paint with Base Coat and the smell will dissipate.
Let’s Paint!
Now we’re ready for paint!
If you are painting a dresser table or chair its best to start at the bottom. Since the top will get the most attention, you’ll want that to look perfect, so leave that for last.
Prime your brush by dipping it in water and wick/shake out the access water out, this will allow the paint to flow out of the brush instead of sucking it in and wasting the paint.
Paint your trim area first ie. Corners then paint in long sweeping strokes, going with the grain.

I flipped the side table on its top and painted long smooth even strokes.
On a horizontal surface, try to go from side to side without stopping, always keeping a wet edge.
HOT TIP: To prevent brush marks make sure not to apply too much pressure, if your bristles are bending at a 45 degree angle or more you’re not applying paint your actually pulling it off. I always say to new painters who attend our workshop is to image buttering bread you want to apply the butter not take it off.
How many coats do I need?
If you are painting something white or off white over a dark piece, you will probably need 2 coats max for solid coverage with Superior Paints. Make sure to let the paint fully dry if your applying a second coat. If it takes you more than 2 coats please sign up for a furniture painting workshop you’re obviously doing something very wrong!

Here's my project one coat was all I needed for full coverage!
HOT TIP: How do I know when I am ready to apply my second coat? Lightly touch the surface if it still feels cold then its not ready, be patient and wait until its back up to room temperature.
Sand
Your surface may feel a little rough to the touch after painting. If your looking for a ultra high baby soft like finish give the surface a VERY light sand 500-600 grit sand paper or sanding pad.

I am very lightly buffing the surface with the sanding pad from the Top Coat Applicator Kit giving it a baby smooth finish.
After all surfaces are smooth to the touch, I use a tack cloth to remove all the chalk paint dust from the surfaces.

I am using the tack cloth to remove the dust and I put it back in the bag to reuse it on my next project.
Time to Seal your project
Yes you always have to seal any surface after its been painted to make it washable, scrub-able and durable.

Superior Top Coat Sealer is available in Flat, Semi and Glossy that will not change the colour however if you apply with semi or glossy it will deepen the colour.
You can apply Top Coat with a brush, sprayer or the Applicator Kit. (we do not recommend using a roller).

Here I am applying my personal favorite Flat Top Coat using the Applicator Kit. I applied 3 coats to ensure it's completely sealed.
Once your piece is sealed enough to your liking make sure to be gentle with your piece and to let it cure for a month before its good and hard.
HOT TIP FROM RAY: For a smooth finish lightly sand between coats of Top Coat to remove any dust particles or blips you many have. Depending on how durable you want your finish to be you may want to apply multiple thin coats. Typically for table tops and kitchen cabinets we apply 3-4 coats, for bodies 2-3 coats and decorative pieces 1-2 coats.
Final Step
Enjoy and show off your your master piece!


I added robe handles painted with Superior Paint Co. Little White.

Things You'll Need
- Furniture
- TSP ECO
- 300 Grit Brillo Pad
- Drop Cloth
- Base Coat (optional)
- Superior Chalk Paint
- Brushes
- Top Coat Sealer
- Top Coat Application Kit
- Tack Cloth (optional)
- Wood Putty and Putty Knife (optional)
- Sand Paper
- Painters Tape (optional)
We absolutely love seeing everyone's makeovers so make sure you join and post your work on the Superior Paint Co. Artisans Pinterest board or tag @superiorpaintco on Instagram to have your work featured!
My advice...
- Take workshops/classes (take as many as your can every time your going to learn something new, get inspired by others and you will make new friends)
- Experiment on sample pieces or scrap wood
- For inspiration look for photos online
Painting should always be fun so don't ever get discouraged if your piece didn't turn out the way you had envisioned there is no shame on repainting it again and again and again because the more you practice the better you will become.
Do Not Mix Different Brands:
We have specialty formulated all our products to work with each other. Never ever mix other brands with our products.
DO NOT Use or Make Home-Made Chalk Paints:
Those of you that know me, you probably regularly have heard me talk about how much it disgusts me to hear about those “homemade chalk paint recipes” that have flooded the internet and Pinterest. Please do not mess with the chemistry of paint it is formulated a certain way for a reason by professional chemists. You should never use a wall paint for painting furniture or your kitchen cabinets. Wall paints are designed for walls not furniture. Also most recipes include adding toxic additives (Yuck), or low quality thickening agents that will give your paint chunky inconsistency and uneven sheen. If you going to spend an afternoon, day or even weeks to refinish a piece make it worth your time, money and energy and do it properly use a professional grade non toxic product that is specifically designed for painting furniture and cabinets (ie Superior Paints).
DO NOT Use Paste Waxes:
I never ever ever ever ever… (you get the point) … recommend using paste wax, bees wax, or any other oily messes they advertise online as a "sealer" for a chalk painted surface… if you have it in you home please only use it for wood surfaces (ie raw wood or lightly stained surfaces). This product will not protect your furniture from damage it will only repel water.
WHY CANT I USE IT OVER CHALK PAINT??? If you read the fine print you will see you have to reapply every 6 months or so… seriously? In 6 months from now I’ve probably painted another 100 pieces and do you think I am gonna walk through my home, showroom and clients homes re waxing furniture in hopes it preserves the piece? I don’t think so! It’s not washable its not scrub-able or durable so why do it??? Personally I want something that is durable enough to stand the test of time!
Example: Ok so one funny story I have to share with you (at the time however it was not so funny at all)… so we had this huge open house over a year ago… where we put all these cool pieces we refinished out in our parking lot all sealed with paste waxes… in the heat of the summer all the paste wax started to melt like a candle and you could see the oil (paste wax) dripping off all the furniture like they were rotisserie chickens in your grocery store. Yep true and very embarrassing story please don’t make the same mistake we did! Which is why we do not or will ever carry a paste like wax EVER! I honesty can tell you so many more horror stories but I think you get the point :)
P.S.
I hope my honesty did not offend anyone (if so I deeply apologize) my advice comes from the fact that we own a professional furniture refinishing shop and I've spent countless hours and wasted hundreds of dollars trying these DIY short cuts claiming to have these magical results which to my dismay they were all a complete fail. I really hope my information has either helped or inspired you... or maybe even both! Thank you so much for reading and Happy Painting Everyone!